Introduction
Voice messages on iPhone let you speak instead of type, share tone and emotion, and reply quickly when you are on the move. They work right inside the Messages app and show up as small audio bubbles that you tap to play. Once you learn how to send a voice message from iPhone, it becomes one of the fastest and most natural ways to communicate.
Many iPhone users know voice messages exist, but they are not sure which icon to tap, how to cancel a recording, or why messages seem to disappear. Some people confuse Messages audio with Voice Memos or think they need a special app or subscription. In reality, everything you need is already built into iOS.
This guide walks you through each step, from sending your first voice message to adjusting settings, saving important clips, and fixing common issues. You will also learn when to choose a voice message instead of text, and how to respect privacy and etiquette while using them. By the end, you will feel confident sending and managing voice messages on any modern iPhone.
What Is a Voice Message on iPhone?
A voice message on iPhone is a short audio clip you record and send through the Messages app. It appears in the chat as an audio bubble with a play button instead of text. The person on the other end taps the bubble to listen.
Voice messages are different from phone calls or voicemail. You do not need both people to be available at the same time, and you do not dial a number. They behave like text messages, but in your own voice. You can send them to anyone who can receive iMessages or regular SMS/MMS, though behavior may differ if the other person does not use an iPhone.
You can also share audio you record in the Voice Memos app as a message. This works well for longer recordings, interviews, or high-quality audio you want to keep. In this article, you will see both options and learn when each one makes more sense.
Now that you understand what voice messages are and how they differ from regular calls and voicemail, it is time to make sure your iPhone is ready to send and receive them reliably.
Requirements Before You Start
Before you learn exactly how to send a voice message from iPhone step by step, check a few basics. These details help you avoid errors and make sure your device behaves as expected.
iOS Version and Device Compatibility
Most current iPhones can send voice messages without extra setup. For the best experience:
- Use an iPhone that supports recent iOS versions, such as iPhone XR or later.
- Go to Settings > General > Software Update and install the latest iOS update available for your device.
- Make sure the Messages app is installed and visible on your Home Screen or in the App Library.
Newer iOS versions sometimes move buttons or change icons. If your screen looks different from instructions you see online, check for updates first. Updating also fixes bugs that may affect audio messages.
Internet, Carrier, and Storage Needs
Voice messages use data and storage, so confirm these details:
- Connection: Turn on Wi‑Fi or mobile data. Go to Settings > Cellular and make sure Cellular Data is enabled if you use 4G or 5G.
- Carrier: Most carriers allow audio messages like texts. If you have trouble, confirm with your carrier that MMS and iMessage are enabled on your line.
- Storage: Audio messages take space. Go to Settings > General > iPhone Storage and check that you have free space for new recordings.
Once these basics are in place, you are ready to send your first audio clip from the Messages app and start using voice messages in daily chats.
How to Send a Voice Message in the Messages App
The Messages app is the fastest way to send short voice messages. It works inside one-on-one threads, group chats, and iMessage conversations. You do not need to install another app or create a new account.
Open the Conversation and Find the Audio Button
Follow these steps to set up your voice message:
- Open the Messages app on your iPhone.
- Tap an existing conversation, or tap the Compose icon to start a new message.
- In the message bar, look for a plus (+) button or an apps button next to the text field, depending on your iOS version.
- Tap that button and look for the Audio or Voice Message icon (often a waveform or microphone symbol).
If you do not see the audio icon, swipe through the little app icons above the keyboard. The Messages app often groups features there, including photos, stickers, and audio messages.
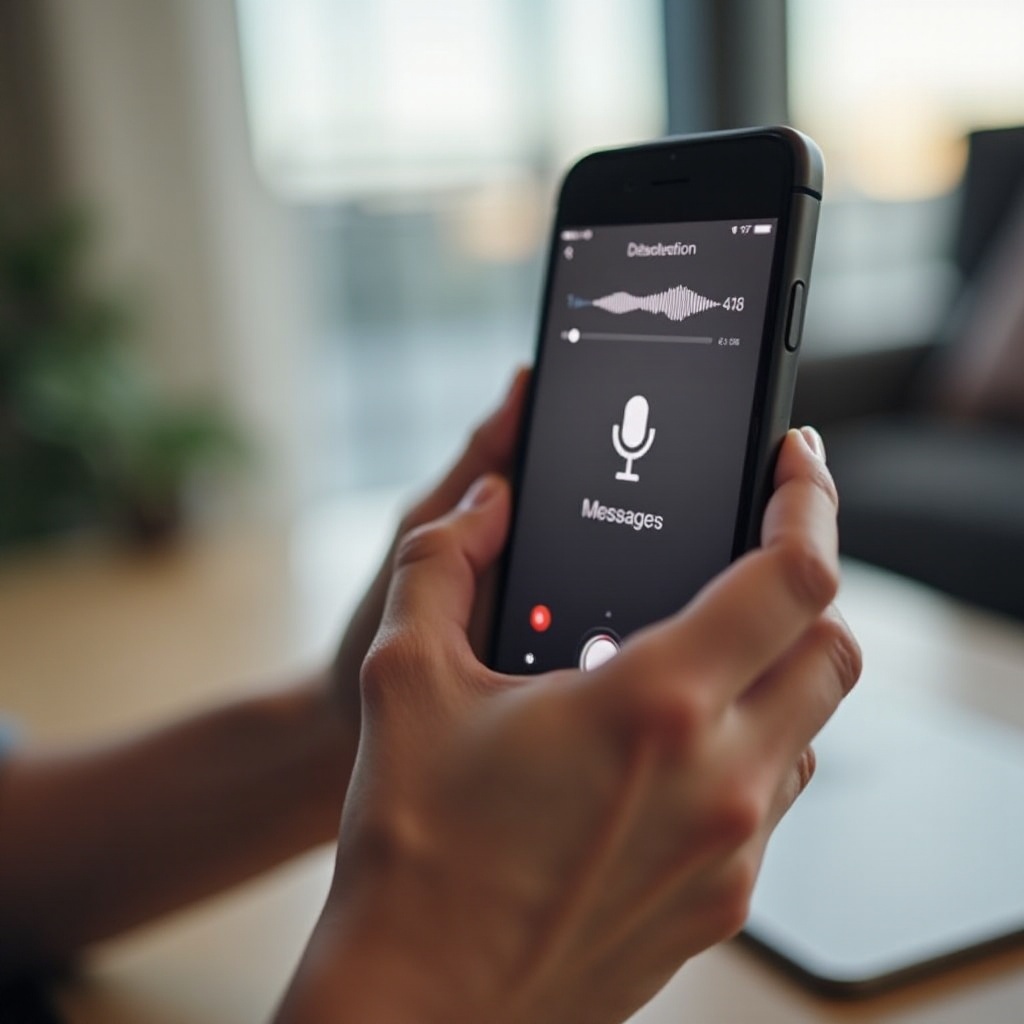
Record, Review, and Send Your Voice Message
Once you find the audio message option:
- Tap the Audio or microphone icon to start recording.
- Hold the iPhone close to your mouth and speak clearly.
- When you finish your sentence or thought, tap Stop or the square icon.
- Tap the Play button to listen to your recording.
- If you like it, tap Send (usually a blue arrow or upward arrow icon).
Keep your messages short and focused. A 10–30 second clip is easier to replay and understand than a long, rambling recording. If you have several points, send multiple clips instead of one very long message.
Cancel or Re‑Record Before Sending
Sometimes you say the wrong thing or capture unwanted background noise. Before you send the clip:
- Tap X, Cancel, or a trash icon (depending on your iOS version) to discard the recording.
- Tap the microphone or audio icon again to start a new recording.
- Repeat the steps until you have a clean, clear message.
If you accidentally send a message you do not like, you may be able to edit or unsend it in an iMessage chat, depending on the recipient’s iOS version and the time passed. However, you can never fully control what the other person does with received audio, so it is safer to cancel and re‑record before tapping send.
Now that you know how to send and refine your own clips, the next step is to learn how to listen to incoming voice messages and keep your conversation organized.

How to Listen to and Manage Voice Messages on iPhone
Receiving voice messages is simple, and the playback controls will feel familiar if you have used music or podcast apps. Good message management helps you avoid clutter, especially in busy group chats.
Play, Pause, and Adjust Volume
To listen to a voice message:
- Open the Messages conversation that contains the audio bubble.
- Tap the play button on the bubble.
- Use the volume buttons on the side of your iPhone to turn the sound up or down.
- Tap pause if you need to stop and resume later.
Some iPhones let you lift the device to your ear to listen privately, similar to a phone call. This uses the earpiece speaker instead of the loudspeaker. If you prefer privacy, test this by playing a message and gently lifting the phone to your ear.
Keep, Delete, or Let Messages Expire
By default, audio messages may disappear after a short period, often around two minutes after you listen. You will usually see a small Keep option next to the message. To manage them:
- Tap Keep under an audio bubble if you want the message to stay in the chat.
- Leave it alone if you are fine with it expiring and being removed.
- Press and hold the audio bubble, then choose More or Delete to remove it sooner.
Keeping too many audio messages can fill your storage, but automatic expiration can remove something you wanted to save. In the next section, you will learn how to change the expiration setting so you stay in control of what is kept and what is deleted.
Forward a Voice Message to Another Contact
If someone sends you a helpful or funny clip, you can forward it:
- Press and hold the audio message bubble.
- Tap More.
- Select the arrow or Forward option.
- Choose the contact or conversation you want to send it to and tap Send.
Forwarding keeps the original recording but shares it with a new person. Always respect privacy before forwarding personal or sensitive audio.
Once you understand how playback and message management work, it is worth customizing how long your audio messages stay on your device by adjusting the built-in expiration settings.
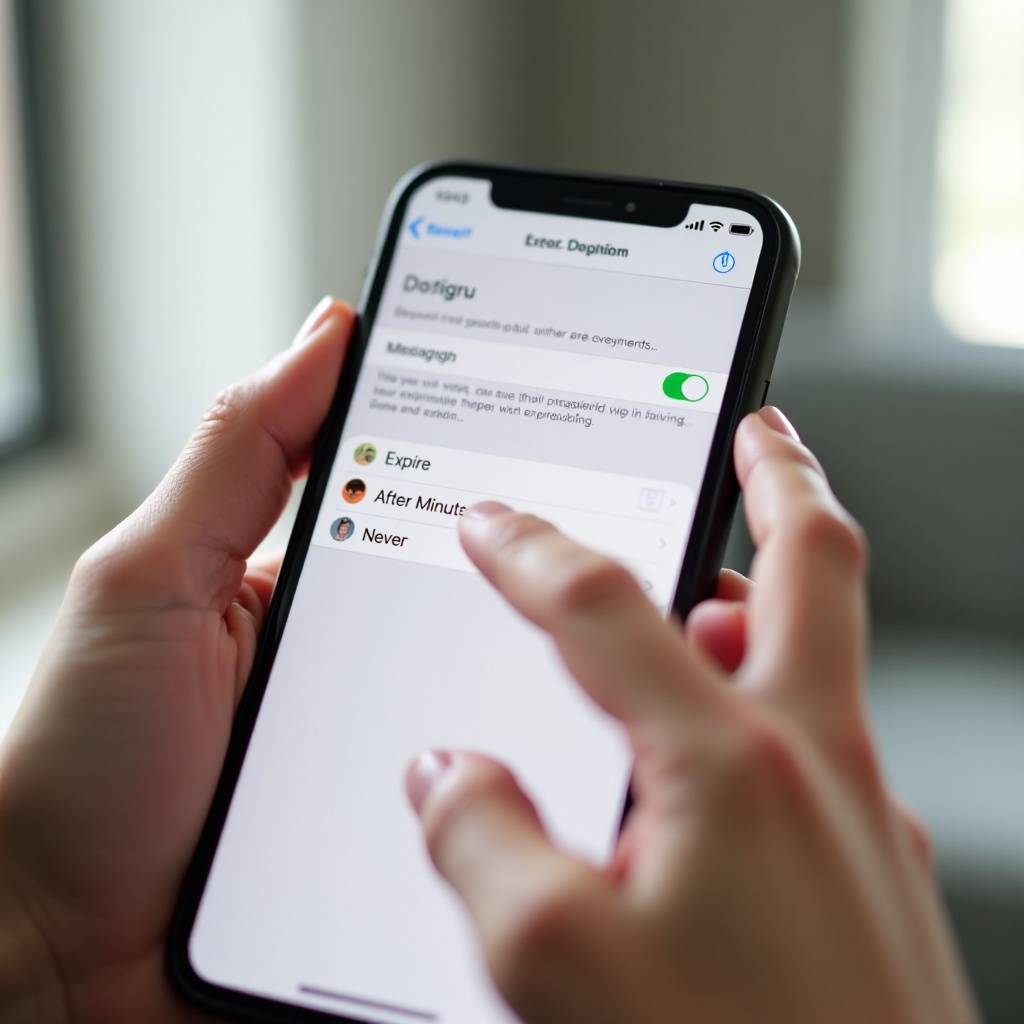
How to Change Audio Message Expiration Settings
The default expiration behavior can surprise users who expect messages to stay forever. If your audio bubbles keep vanishing, you probably have the standard ‘expire after 2 minutes’ setting enabled.
Accessing Audio Message Settings in iOS
To change this setting:
- Open Settings on your iPhone.
- Scroll down and tap Messages.
- In the Messages settings, find the Audio Messages section.
- Look for Expire.
This small option controls whether your phone automatically deletes audio messages to free up space. Adjusting it gives you more control over your message history.
Choosing Between ‘After 2 Minutes’ and ‘Never’
When you tap Expire, you usually see two choices:
- After 2 Minutes:
- Audio messages delete themselves shortly after you listen.
- Good for privacy and saving storage.
-
Risky if you want to keep important messages but forget to tap Keep.
-
Never:
- Audio messages stay in your conversations until you delete them.
- Ideal if you often review old clips or use them as verbal notes.
- Requires more storage management over time.
Pick the option that matches how you use Messages. If you switch to Never, consider cleaning up old threads or exporting important messages to another location. The next section will show you how to save and share voice messages outside the Messages app so you can keep key recordings safe.
How to Save or Share Voice Messages Outside Messages
Sometimes a voice message matters enough that you want a backup outside the Messages app. You might need proof of information, a memorable moment, or work instructions you want to store with your other files.
Save a Voice Message to Files or Notes
To save a voice message from a chat:
- Press and hold the audio message bubble.
- Tap Save or Copy, depending on your iOS version.
- If you choose Save, the file may go to the Voice Memos app or the Files app.
- If you choose Copy, open Notes or Files, create a new note or folder, and tap and hold to Paste the audio.
Storing audio in Files or Notes makes it easier to organize clips by project, person, or topic. You can also rename the files to something descriptive, such as ‘Project-Update-Audio.m4a’.
Share via Mail, AirDrop, or Third‑Party Apps
You can send a voice message file outside Messages:
- Press and hold the audio bubble.
- Tap Share.
- Choose an option from the share sheet:
- Mail to email the clip.
- AirDrop to send it directly to another Apple device nearby.
- Third‑party apps like WhatsApp or Slack if they appear in the list.
This approach is useful when someone does not use iMessage or when you want the audio in a work tool or collaboration app.
Back Up Important Audio Messages to iCloud or a Computer
To protect key recordings:
- Make sure you have iCloud Backup enabled under Settings > [your name] > iCloud > iCloud Backup.
- Save important clips into Files or Voice Memos, which can sync with iCloud if you enable them.
- For a local copy, connect your iPhone to a Mac or PC and use Finder or iTunes to back up the device.
By moving voice messages into your regular backup flow, you reduce the risk of losing them if you change phones or reset your device. For longer or higher-quality audio, though, the built‑in Voice Memos app may be a better tool than the Messages feature.
Using Voice Memos as an Alternative to Voice Messages
Voice Memos is ideal when you need more control, better quality, or longer recordings than typical Messages audio clips. You can still share these recordings as messages, but they live independently in their own app.
Record High‑Quality Audio in Voice Memos
To record in Voice Memos:
- Open the Voice Memos app.
- Tap the red record button to start.
- Hold the phone steady and speak clearly into the bottom microphone.
- Tap the red square button to stop.
Voice Memos can record much longer than a typical voice message. This works well for lectures, interviews, or detailed instructions you want to replay many times.
Trim and Edit Your Recording Before Sharing
You can clean up your recording before you send it:
- In Voice Memos, tap your recording.
- Tap the options or edit icon (often three dots or sliders).
- Use the trim tool to remove silent or noisy parts at the beginning or end.
- Rename the memo with a clear title so you can find it later.
Editing reduces file size and makes the message easier for others to listen to, as they do not have to skip through long gaps.
Send a Voice Memo via Messages, Mail, or Other Apps
To share a finished memo:
- Tap the recording in Voice Memos.
- Tap the share icon.
- Choose Messages to send it as an attachment in a conversation.
- Or choose Mail, AirDrop, or another app from the share sheet.
Using Voice Memos together with Messages gives you the flexibility of long recordings and the convenience of native messaging. If something goes wrong with your audio, though, you will want a quick way to diagnose and fix it.
Troubleshooting Common Voice Message Problems
Even when you know how to send a voice message from iPhone, issues can appear. Messages may not send, audio may play too softly, or clips might not download at all. A few targeted checks usually solve these problems.
When Voice Messages Won’t Send or Are Stuck
If your message sits with a ‘sending’ status or an exclamation mark:
- Check your internet connection: turn Wi‑Fi off and on, or switch between Wi‑Fi and cellular.
- Confirm Airplane Mode is off in Control Center.
- Restart the Messages app: open the App Switcher, swipe it away, then reopen.
- Restart your iPhone if the problem continues.
- If many messages fail, sign out and back into iMessage in Settings > Messages > iMessage.
Persistent failures may point to carrier restrictions or a temporary network outage, so you may want to check with your carrier if the issue lasts.
Fixing No Sound or Very Low Volume
If you cannot hear the message clearly:
- Use the side volume buttons while playing the audio to increase volume.
- Make sure the Mute switch (if your model has one) is off.
- Ensure no Bluetooth headphones or speakers are connected if you expect sound from the built‑in speaker.
- Gently clean the speaker area with a soft, dry brush.
- Test other apps like Music or YouTube. If all audio is low, you may have a hardware or system issue.
If only Messages audio is quiet, update iOS and test again. A software bug may affect that specific app.
What to Do If Audio Messages Are Missing or Not Downloading
If a message shows ‘Tap to Download’ but nothing happens:
- Confirm a stable data or Wi‑Fi connection.
- Check Settings > Messages to ensure data‑saving options are not interfering.
- Ask the sender to resend the message or share it via Voice Memos if the clip fails repeatedly.
- Free up storage under Settings > General > iPhone Storage.
If messages disappear quickly, review your Audio Message Expire setting, as described earlier, and change it to Never if needed.
Once your setup is stable and you know how to handle common problems, you can focus on using voice messages effectively and respectfully in everyday conversations.
Tips, Privacy, and Etiquette for Voice Messages
Voice messages feel personal and convenient, but they can also annoy or expose private information if you use them carelessly. A few simple habits keep your conversations smooth and respectful.
When to Use Voice Messages vs. Text
Choose a voice message when:
- You need to share tone, emotion, or complex details.
- You are walking, commuting, or busy and cannot type easily.
- You want a more personal touch than plain text.
Stick to text when:
- The recipient is likely in a meeting, class, or quiet place.
- You need a quick, searchable answer like an address or phone number.
- You are sending information they will copy and paste.
Balancing voice and text keeps your communication efficient and considerate.
Protecting Your Privacy and Your Recipient’s
To stay safe and respectful:
- Avoid sharing passwords, bank details, or highly sensitive information in any message format.
- Remember that the recipient can save, screenshot the chat, or forward your audio.
- Use headphones or lower the volume in public so others cannot hear private details.
- Ask before forwarding someone else’s voice message to another person or group.
Treat each audio clip as something that may exist longer than you expect, and speak accordingly.
Best Practices for Clear, Concise Audio
Improve your voice messages with a few habits:
- Move to a quieter spot if possible.
- Hold the microphone area close but not touching your mouth.
- Speak at a steady pace and avoid talking over others in group chats.
- Keep messages short and focused; send multiple clips for separate topics.
Clear, concise audio saves time for both you and the listener and makes your messages feel more professional and thoughtful.
Conclusion
Learning how to send a voice message from iPhone turns the Messages app into a flexible tool that fits real conversations. You now know how to find the audio button, record, cancel, and send clean clips that express tone better than text. You have also seen how to adjust expiration settings, save important messages, share them with other apps, and use Voice Memos when you need longer or higher‑quality audio.
When problems appear, you can check your connection, volume, and storage, or switch to alternative tools like Voice Memos while you fix the issue. With a bit of etiquette and privacy awareness, voice messages become a natural part of how you stay in touch.
Try sending a short voice message in your next conversation and see how much smoother and more personal your communication feels.
Frequently Asked Questions
Why can’t I find the audio message button on my iPhone?
The audio button may now sit behind the plus (+) or apps icon next to your text field. Tap that icon and look for an Audio or microphone symbol. If you still do not see it, update iOS in Settings > General > Software Update, then reopen Messages. On some devices, your keyboard or layout settings can also hide certain icons, so try rotating the phone to landscape or closing and reopening the app.
Do voice messages use data or count as texts on my plan?
Voice messages sent as iMessages use data, not standard SMS minutes. They travel over Wi‑Fi or mobile data, similar to photos or videos. If you send audio to someone who does not use iMessage, your phone may send it as MMS, which can count against your carrier’s messaging plan. To control data use, connect to Wi‑Fi when sending many or large audio clips and check your plan details with your carrier.
Can I recover a deleted voice message on my iPhone?
Once you delete an audio bubble from a Messages conversation, recovery is difficult. You can sometimes restore an entire conversation or device from an iCloud or computer backup, but this may overwrite newer content. If the message was saved to Voice Memos, Files, or Notes, check the Recently Deleted folder in those apps. To avoid loss in the future, change the Audio Message Expire setting to Never and save important clips outside Messages.