Introduction
Stickers can make your iPhone look fun, unique, or easier to recognize on a crowded table. People stick them on the back glass, the sides, the camera area, and especially on cases. The trouble starts when you want a cleaner look or need to trade in your phone and those stickers no longer seem like a good idea.
If you rush and pull stickers off without a plan, you can scratch the surface, damage coatings, or leave a sticky layer that collects dust and grime. That mess not only looks bad but can also affect how much you get for your phone when you sell or trade it.
Knowing how to remove stickers on iPhone safely helps you avoid all of this. In this guide, you will learn how to remove fresh and old stickers, deal with stubborn adhesive, and clean cases and accessories without harming your device. Each section flows into the next so you can follow a clear, step-by-step process from preparation to prevention.
To start, you need to understand your iPhone’s surface and what kind of sticker you are dealing with, because that will shape every decision you make next.

Understand Your iPhone and Sticker Type First
Before you touch the sticker, take a moment to look at both your iPhone and the sticker itself. Different materials react differently to pressure, heat, and cleaning products. A method that works well on a glass back may not be ideal for a matte aluminum body.
By checking the surface and sticker type, you can choose the gentlest effective method. This small step lowers the risk of scratches, dull patches, or damaged finishes and makes the rest of the process smoother and more predictable.
Identify Your iPhone Surface: Glass, Aluminum, or Stainless Steel
Most recent iPhones use a glass back. Some older models and certain iPhone SE models use aluminum backs with a matte finish. The frame around the phone might be aluminum or polished stainless steel.
This matters because:
- Glass is smooth and harder to stain but can crack if you apply strong pressure or concentrated heat.
- Aluminum and matte finishes can scratch more easily and may show shiny or dull spots if you scrub too hard.
- Stainless steel edges can show fine scratches quickly when you use sharp or rough tools.
If you are unsure about your model, you can check Apple’s official site for details on the materials used in your specific iPhone.
Types of Stickers: Paper, Vinyl, Skins, and Store Labels
Next, look closely at the sticker itself:
- Paper stickers: They often tear and leave a thick layer of adhesive behind.
- Vinyl or plastic stickers: They usually peel more cleanly but may leave a thin sticky film.
- Full-cover skins: These are designed to stay in place and may need more patience and gentle heat to remove.
- Store or inventory labels: These often use cheaper adhesive that dries out and becomes stubborn.
The sticker type helps you predict how easily it will lift and how much residue you will need to clean later.
Why Sticker Age and Quality Matter for Removal
A fresh sticker usually peels off in one piece. An older sticker behaves very differently. Signs that age is working against you include:
- Edges that look dry, cracked, or dirty.
- Sticker surface that feels brittle when you touch it.
- Visible fading or flaking.
High-quality stickers and skins often use better adhesive that comes off more cleanly. Cheap labels can break down and crumble. If a sticker has been on your iPhone for many months or has sat in direct sun or heat, expect to go slower and use extra care.
Once you know what you are dealing with, the next step is to prepare your iPhone and workspace to keep everything safe while you work.
Safety Prep Before Removing Any Sticker
Good preparation protects your iPhone from accidental drops, liquid damage, and unnecessary stress while you remove the sticker. It also makes it easier for you to see what you are doing, so you do not overdo pressure or heat in the wrong spot.
This section is quick but important. A few minutes spent here can prevent costly mistakes and make the sticker removal process feel calmer and more controlled.
Power Off and Unplug Your iPhone
Always begin with these steps:
- Unplug any charging cable or connected accessory.
- Power off your iPhone completely using the standard shutdown method for your model.
Working on a powered-off device reduces the risk of short circuits if a small amount of liquid contacts a port or button. It also prevents accidental taps and swipes that could cause calls, messages, or unwanted changes while you work.
Remove Case, Screen Protector, and Accessories
Once your iPhone is off, clear away anything that might get in your way:
- Remove the case, including MagSafe or magnetic accessories.
- Detach any PopSockets, rings, or grips.
- If a sticker is on a screen protector, consider removing the protector and replacing it later.
This gives you direct access to the sticker and prevents pressure on the edges of a case or screen protector, which can crack or bend if you pull at a bad angle.
Set Up a Clean, Well-Lit Workspace
Place your iPhone on a soft, clean surface, such as:
- A folded microfiber cloth
- A soft towel
- A non-slip desk mat
Make sure the area is well lit so you can see tiny scratches, edges, and residue. Avoid working near sinks, open drinks, or messy areas. A stable, clean workspace makes it easier to control your tools and movements in the next steps.
With your iPhone powered off, accessories removed, and a safe workspace ready, you can now gather the tools and cleaning products that will help you remove stickers without damage.
Tools and Products You Will Need
You do not need special professional equipment to remove stickers from an iPhone, but you do need tools that are gentle and precise. The aim is to lift the sticker and soften the adhesive without scratching the surface or letting liquid seep into ports.
Having the right items ready before you start means you will not have to pause in the middle of the process, which helps you maintain a steady, careful approach.
Gentle Tools: Microfiber Cloths, Plastic Cards, and Cotton Swabs
Prepare a small kit with these basics:
- Microfiber cloth: Ideal for wiping, polishing, and applying light pressure without scratching.
- Plastic card: An old gift card, store loyalty card, or hotel key card works well to lift edges.
- Cotton swabs: Useful for applying small amounts of liquid near edges, buttons, and the camera area.
- Soft tissue or paper towel: Only for drying cases or tools, not for heavy scrubbing on the phone.
Avoid anything metal, such as keys, blades, or tweezers. These can scratch glass, aluminum, and stainless steel with very little pressure.
Safe Cleaning Liquids for iPhone Surfaces
For most sticker and residue jobs, you only need small amounts of:
- Clean water: Use a slightly damp microfiber cloth, never a soaked one.
- Mild dish soap (for cases only): A drop in warm water helps clean plastic or silicone cases.
- Isopropyl alcohol (around 70%): Helps dissolve sticky residue when used sparingly.
- Phone-safe adhesive remover: A product specifically labeled safe for electronics, screens, or plastics.
Always apply liquids to a cloth or cotton swab first. Never spray or pour liquid directly onto your iPhone.
Products and Methods to Avoid
Skip these products on your iPhone itself:
- Acetone or nail polish remover
- Harsh solvents, paint thinners, or gasoline-based cleaners
- Window cleaner, oven cleaner, or bleach
- Abrasive powders, scrubbing pads, or rough sponges
These can strip protective coatings, cloud the glass, or stain the finish. When unsure, stick to water, gentle soap for cases, and isopropyl alcohol used in moderation.
With your tools ready, you can move on to the practical steps for removing a fresh sticker, which is usually the easiest scenario to handle.
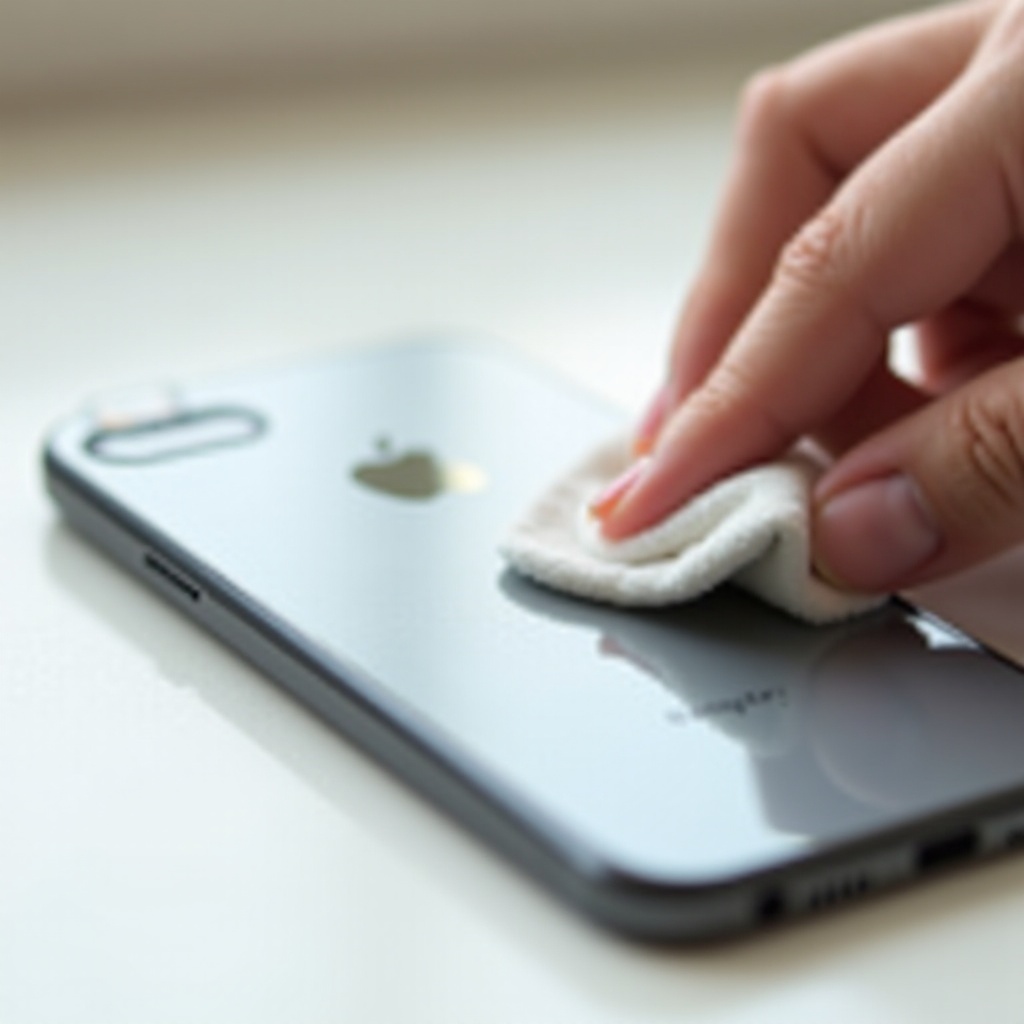
How to Remove a Fresh Sticker From Your iPhone
Fresh stickers are still flexible and usually peel away in one piece. If you move slowly and use the right angle, you can often remove them with very little residue left behind. The key is control, not force.
This section walks you through the basic technique that you will later adapt for more stubborn stickers.
Start With a Corner: Fingernail or Plastic Card
Begin with these steps:
- Hold the iPhone firmly in one hand with the sticker facing up.
- Use a fingernail or the corner of a plastic card to gently catch an edge of the sticker.
- Slide under the edge just enough to lift a small section you can grasp.
Avoid digging too hard into the surface. You want to lift the sticker, not scrape the iPhone. If one corner is difficult, try another side.
Use the ‘Low and Slow’ Peeling Technique
Once you have a corner lifted:
- Pinch the lifted edge between your fingers.
- Pull the sticker back over itself at a low angle, close to the surface of the phone.
- Move slowly and steadily, maintaining that low angle instead of pulling straight up.
This ‘low and slow’ approach keeps more adhesive attached to the sticker rather than the phone. If you feel sudden resistance, pause and adjust your grip rather than tugging harder.
What to Do if the Sticker Tears
If the sticker tears during removal:
- Stop pulling.
- Use your fingernail or plastic card to lift another corner or edge of the remaining part.
- Repeat the same low-angle peeling motion on each section until all pieces are off.
Do not worry if small bits or a thin film remain on the surface. You will handle the leftover residue safely in a later section. For now, focus on removing as much of the sticker as possible without scratching the phone.
Fresh stickers are only part of the challenge. Older or heat-baked stickers often need more care and sometimes a bit of gentle heat.
Removing Old or Stubborn Stickers Safely
Old or stubborn stickers tend to crack, flake, and leave thick adhesive patches behind. The adhesive may have hardened over time or baked onto the surface from sun and heat. If you pull too hard in frustration, you risk scratching or spreading sticky mess around.
Instead of fighting the sticker, use a slower, controlled process that softens the adhesive before you peel.
How to Tell if Adhesive Is Hardened or Baked On
You are likely dealing with hardened adhesive if you notice:
- Edges that will not lift easily with a fingernail.
- Sticker material that feels dry or brittle.
- Dirt stuck around the edges where glue has seeped out.
- Visible cracks in the sticker design.
If you see these signs, plan on using a combination of gentle heat and patient peeling.
Using Gentle Heat With a Hair Dryer the Right Way
Heat helps many adhesives soften, but you must treat your iPhone carefully.
Follow these steps:
- Set a hair dryer to low or medium heat.
- Hold it about 8–12 inches away from the back of your iPhone.
- Move it constantly in small circles over the sticker for 10–15 seconds.
- Test an edge with a fingernail or plastic card. If it lifts more easily, start peeling using the same low-angle technique.
Important points:
- Do not focus heat on one spot for too long.
- Do not use a heat gun or high-heat setting directly on the phone.
- If the device feels hot in your hand, stop and let it cool before continuing.
When to Stop and Change Your Approach
If the sticker still crumbles or leaves thick clumps of glue after gentle heat:
- Pause and remove any large loose pieces.
- Switch to softening the remaining adhesive with a slightly damp microfiber cloth.
- If needed, use a small amount of isopropyl alcohol on the cloth to help loosen the glue.
- Wipe in short, gentle motions instead of scrubbing hard.
If you feel yourself getting impatient, take a short break. Rushing or using force is when damage usually happens. Once you remove the main sticker, you can adjust your technique based on where the sticker was placed on the phone.
Removing Stickers From Different iPhone Surfaces
How you remove stickers on iPhone also depends on the exact location. The back glass, aluminum body, side frame, and camera bump all require slightly different levels of care. A method that is fine on a flat glass back may not be ideal around ports and buttons.
This section helps you adapt your technique to each surface so you protect the most sensitive areas of your iPhone while still getting a clean result.
Glass Backs on Recent iPhone Models
For iPhones with glass backs:
- Use your fingernail or plastic card to lift a corner.
- Peel slowly at a low angle to remove the sticker.
- If residue remains, use a microfiber cloth with a very small amount of isopropyl alcohol.
Glass handles light wiping well, but you should:
- Avoid pressing hard near the edges where the glass meets the frame.
- Keep metal tools and abrasive materials away from the surface.
- Be careful with heat around the camera area and wireless charging coil.
Aluminum or Matte Backs on Older and SE Models
Aluminum and matte finishes need more caution:
- They can show fine scratches very easily.
- Aggressive rubbing can create shiny spots or uneven patches.
For these models:
- Focus on peeling the sticker in one piece whenever possible.
- Use only a fingernail or a smooth plastic card to lift edges.
- For remaining residue, start with a damp microfiber cloth.
- If needed, use a small amount of isopropyl alcohol, tested on a less visible area first.
Testing on a small spot helps ensure the cleaner will not change the appearance of the finish.
Sides, Buttons, and the Camera Bump
Stickers that wrap around the frame or sit near the camera can trap adhesive in tight spaces. To deal with these areas safely:
- Peel the main body of the sticker from the flattest area first.
- Use cotton swabs with a tiny amount of alcohol to clean close to buttons, seams, and the camera bump.
- Always wipe away from openings like the speaker, microphone, and ports.
Never pour liquid near camera lenses, speaker grilles, or charging ports. Once the sticker is gone, there is often a thin film of residue left to handle.
How to Clean Sticky Residue After the Sticker Is Gone
Even if you remove the sticker carefully, a sticky film usually remains on the surface. This residue attracts dust, fingerprints, and dirt, so it is worth removing completely. The key is to start with the mildest method and only step up when necessary.
This approach protects the finish of your iPhone and keeps cleaners from doing more harm than good.
Start Mild: Water and Microfiber Cloth
For light residue:
- Slightly dampen a microfiber cloth with clean water.
- Rub the sticky area in small circles with gentle pressure.
- Dry the area with a clean, dry part of the cloth.
On a detachable case, you can:
- Use a drop of mild dish soap in warm water.
- Gently rub the case to remove residue.
- Rinse thoroughly and dry before putting it back on your phone.
Do not use dish soap directly on your iPhone itself.
Using Isopropyl Alcohol Correctly on iPhone
If water alone is not enough:
- Apply a small amount of 70% isopropyl alcohol to a corner of a microfiber cloth or cotton pad.
- Gently wipe the sticky area with short, controlled strokes.
- Immediately dry the area with a clean part of the cloth.
Keep these rules in mind:
- The cloth should be damp, not wet or dripping.
- Do not let alcohol pool near the camera, buttons, or ports.
- Stop and switch back to water if the surface looks dull or changes appearance.
When to Use a Phone-Safe Adhesive Remover
For very stubborn residue that will not respond to water or alcohol:
- Choose an adhesive remover labeled safe for electronics, screens, or plastics.
- Put a tiny amount on a cloth or cotton swab, not directly on the phone.
- Gently work it into the residue, then wipe clean with a slightly damp cloth and dry.
Use these products sparingly and only when needed. If you are unsure, test the remover on a case or another non-critical surface first.
This residue removal process works for the phone itself, but cases and accessories sometimes allow slightly stronger cleaning, which you will see next.
Sticker Removal on Cases and Accessories
Many people wisely choose to put stickers on their cases instead of directly on their iPhone. This makes customization easier and protects the phone, but the case can still build up sticky patches and dirt around the stickers.
The good news is that most cases and accessories can handle more intensive cleaning than the phone, as long as you match the method to the material.
Clear and Hard Plastic Cases
Clear plastic cases show stickers and residue very clearly, but they can scratch and turn cloudy if you use harsh chemicals.
To clean them:
- Remove the case from your iPhone.
- Peel the sticker off using the same low-angle method you used on the phone.
- Soak the case in warm water mixed with a small amount of mild dish soap.
- Rub gently with your fingers or a soft cloth to remove remaining adhesive.
- Rinse thoroughly and dry completely before reinstalling.
Avoid strong solvents or pure alcohol on clear plastic, as they can cause clouding or fine cracks over time.
Silicone, TPU, and Soft Cases
Soft cases can stretch or warp if you pull too hard, so use extra care:
- Peel the sticker off slowly, supporting the material with your other hand.
- Wash the case in warm, soapy water.
- Use your fingers to rub away any remaining adhesive.
- Rinse well and allow the case to air dry fully.
If some residue remains, you can use a very small amount of alcohol on a cloth, then rinse the case again.
Leather Cases, Chargers, and Other Accessories
Leather and certain accessories require gentler handling:
- Leather cases:
- Peel the sticker slowly and evenly.
- Dab residue with a slightly damp cloth, do not soak the leather.
-
Use a leather cleaner or conditioner afterward if you have one.
-
Chargers and cables:
- Remove stickers from the plastic parts.
- Clean with a little alcohol on a cloth while keeping liquid away from the connectors.
Once your phone and accessories are clean, it is just as important to know what not to do as what to do. That is where the next section comes in.
Common Mistakes to Avoid When Removing Stickers
Many iPhones suffer more from bad removal methods than from the stickers themselves. Avoiding a few common mistakes can protect your device and make the whole process less stressful.
By understanding what to avoid, you can focus on safe, effective techniques and keep your phone looking as close to new as possible.
Scratching With Keys, Blades, or Hard Tools
When stickers feel stuck, people often reach for the nearest sharp object, such as:
- Keys
- Razor blades
- Metal tweezers or screwdrivers
These hard tools can cut into glass, gouge aluminum, and scratch stainless steel quickly. Even one slip can leave a permanent mark.
Stick to fingernails, plastic cards, and soft tools instead. They may require a bit more time, but they dramatically lower your risk of damage.
Using Harsh Chemicals or Too Much Liquid
Strong chemicals and excess liquid are another common problem. They can:
- Strip protective coatings from glass and metal.
- Cloud plastic or leave stains.
- Seep into ports and speakers and cause internal damage.
Always use minimal liquid and apply it to a cloth, not directly on the device. Stay with water, mild soap for removable cases, and isopropyl alcohol used carefully.
Overheating Your iPhone With Direct High Heat
Heat can help with adhesive, but too much heat is dangerous for your battery and internal components.
Avoid:
- Heat guns.
- Hair dryers on high heat held very close to the device.
- Leaving the phone under a hot lamp or in direct sun to ‘soften’ the sticker.
If you use a hair dryer, keep it moving, use low or medium heat, and stop if the phone feels uncomfortably warm.
By avoiding these mistakes, you protect your iPhone while you remove stickers. The final step is to learn how to prevent sticker problems from returning.
How to Prevent Sticker Problems in the Future
Once you have spent time carefully removing stickers and cleaning adhesive, it makes sense to avoid repeating the same work again. A few small habits help you enjoy personalization without long-term mess or risk to your phone.
This final section gives you practical ideas to keep your iPhone cleaner and make any future sticker changes easier.
Put Stickers on the Case, Not Directly on the Phone
The simplest and most effective rule is this:
- Put stickers and decals on your case.
- Keep the iPhone itself sticker-free.
If you like to change your style often:
- Use a clear case and place stickers on the outside.
- Swap cases instead of peeling and re-sticking on the phone.
Your device stays clean and protected underneath, and you can replace the case if it gets too scratched or sticky.
Choose Removable Decals, Skins, and MagSafe Accessories
When you shop for decorations or accessories:
- Look for words like ‘removable’, ‘repositionable’, or ‘low-tack’ on sticker packaging.
- Consider quality vinyl skins that are designed to peel off cleanly.
- Use MagSafe wallets, rings, and decorative MagSafe discs to change the look without adhesive.
These options give you flexibility and style while keeping adhesive off your phone’s actual surface.
Clean and Inspect Regularly, Especially Before Trade-In
Make a simple routine:
- Wipe your iPhone and case with a microfiber cloth weekly.
- Check for peeling edges or early residue around stickers.
- Remove stickers well before you sell or trade in the phone.
Removing stickers early is always easier than dealing with them after years of wear. A clean, undamaged iPhone often gets better trade-in values and sells faster if you list it online.
Conclusion
Knowing how to remove stickers on iPhone safely comes down to careful preparation, gentle methods, and patience. Start by understanding your phone’s surface and the type of sticker you are dealing with. Then power off your device, set up a safe workspace, and use soft tools like plastic cards and microfiber cloths.
Peel stickers using a low and slow motion, and soften stubborn adhesive with gentle heat and small amounts of safe cleaners. Avoid metal tools, harsh chemicals, and excessive heat so you do not damage glass, aluminum, or coatings. Once your phone is clean, keep future stickers on your case and choose removable options to make your life easier next time.
With these steps and habits, you can enjoy a customized look today and still keep a clean, high-value iPhone ready for trade-in or resale when you are ready for your next upgrade.
Frequently Asked Questions
Is it safe to use Goo Gone or similar adhesive removers on my iPhone?
Most general adhesive removers are designed for hard household surfaces, not electronics. Some can be too strong for your iPhone’s coatings. If you decide to use one, choose a formula labeled safe for electronics or screens, apply a tiny amount to a cloth or cotton swab (never directly on the phone), and use it very sparingly. It is safer to test the product first on a case or a non-critical plastic surface before applying it near your device.
Can stickers permanently damage my iPhone’s glass or coating?
The sticker material itself rarely damages glass, but adhesive can leave residue that traps dirt and may cause light staining over a long time. The greater risk comes from harsh removal methods, like scraping with metal tools, using strong solvents, or applying too much heat. If you remove stickers slowly, use soft tools, and clean residue with safe products like water and isopropyl alcohol, permanent damage is unlikely.
How do I remove multiple stickers from my iPhone at the same time?
Do not try to rip several stickers off at once. Handle them one by one so you can control the angle and pressure. Start with the largest or oldest sticker since it is usually the hardest to remove. Peel each sticker using the low and slow method, then clean any leftover residue before moving on to the next one. This approach takes a bit longer but prevents tearing, spreading glue, and accidentally scratching the surface.