Introduction
Voice adds tone, warmth, and detail that text cannot match. When you need to explain something fast, share a quick update, or respond while your hands are busy, iMessage voice messages get it done on iPhone, iPad, Mac, and Apple Watch. Recent interface changes moved the old microphone button, which makes many users think the feature is gone. It is still there, just tucked behind the plus button in the Messages app drawer.
This guide shows how to send a voice message on iMessage on each Apple device. You will get the fastest steps, learn how to preview or cancel a clip, and see how to keep, save, and export audio. If something goes wrong, use the troubleshooting section to fix issues such as missing audio controls, delivery errors, or microphone access problems. We finish with privacy and etiquette so you share your voice with care. First, here is the fastest way to send your first audio message on iPhone.
Quick Answer: How to Send a Voice Message on iPhone
If you only need the basics, follow these steps:
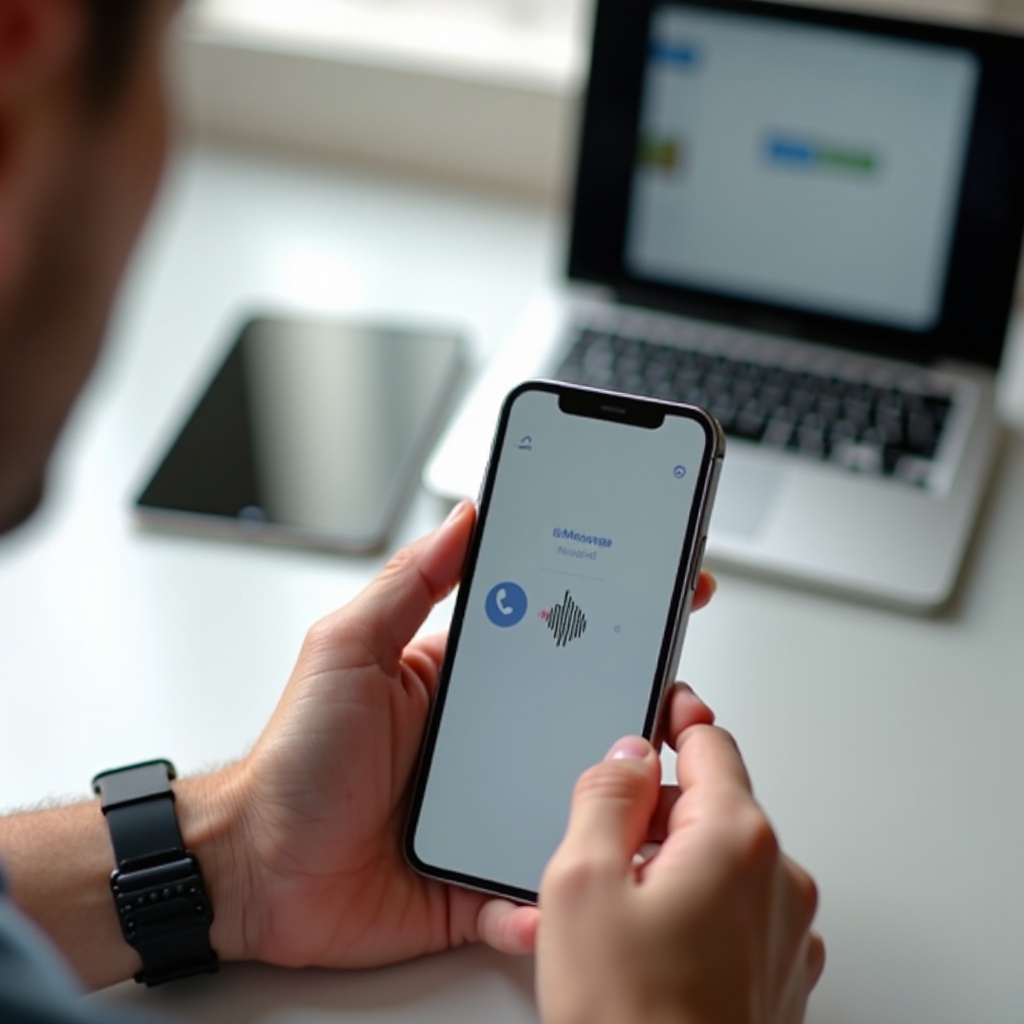
1) Open Messages and choose a conversation.
2) Tap the plus button to open the app drawer.
3) Tap Audio.
4) Press and hold the red record button to speak. Swipe up to lock for hands free recording.
5) Tap Stop to finish.
6) Tap Play to preview, tap X to cancel, or tap Send to deliver.
You can do the same in group chats. If you do not see the plus button, update iOS, force quit Messages, and reopen it. Now that you know the quick path, make sure your setup is ready so you avoid common hiccups.
What You Need: Software, Settings, and Permissions
A quick check of software and settings prevents most recording and delivery problems. Update your iPhone or iPad to a recent iOS or iPadOS version, and your Mac to a recent macOS version. Newer updates place the Audio tool in the Messages app drawer and improve reliability. Turn iMessage on in Settings > Messages on iPhone or iPad. On Mac, open Messages, then Settings or Preferences, and sign in with your Apple ID.
Grant microphone access. On iPhone or iPad, go to Settings > Privacy and Security > Microphone and allow Messages. On Mac, open System Settings > Privacy and Security > Microphone and allow Messages. Test your mic in Voice Memos to confirm sound quality and input volume.
Check your network. iMessage uses Wi Fi or cellular data. If iMessage is unavailable, your device may attempt to send audio as MMS, but carriers often compress or block audio. For best results, ensure both you and your contact use iMessage. With setup confirmed, you are ready to send audio from your iPhone with full control and clean sound.
iPhone: Step-by-Step to Record and Send a Voice Message in iMessage
You now know where the feature lives. Here is a complete walk through with tips to keep your clips clear and your workflow fast.
Find the Audio tool in the Messages app
– Open Messages and pick a conversation.
– Tap the plus button to open the app drawer.
– Tap Audio. A large record control appears above the keyboard.
Press and hold vs lock to record for hands free
– Press and hold the record button for quick notes. Release to stop.
– For longer messages, press and hold, then swipe up to lock recording. This lets you relax, think, and speak at a steady pace without holding your finger.
– Hold the phone near your mouth, but not too close. Aim for a calm room and keep the phone steady to reduce noise.
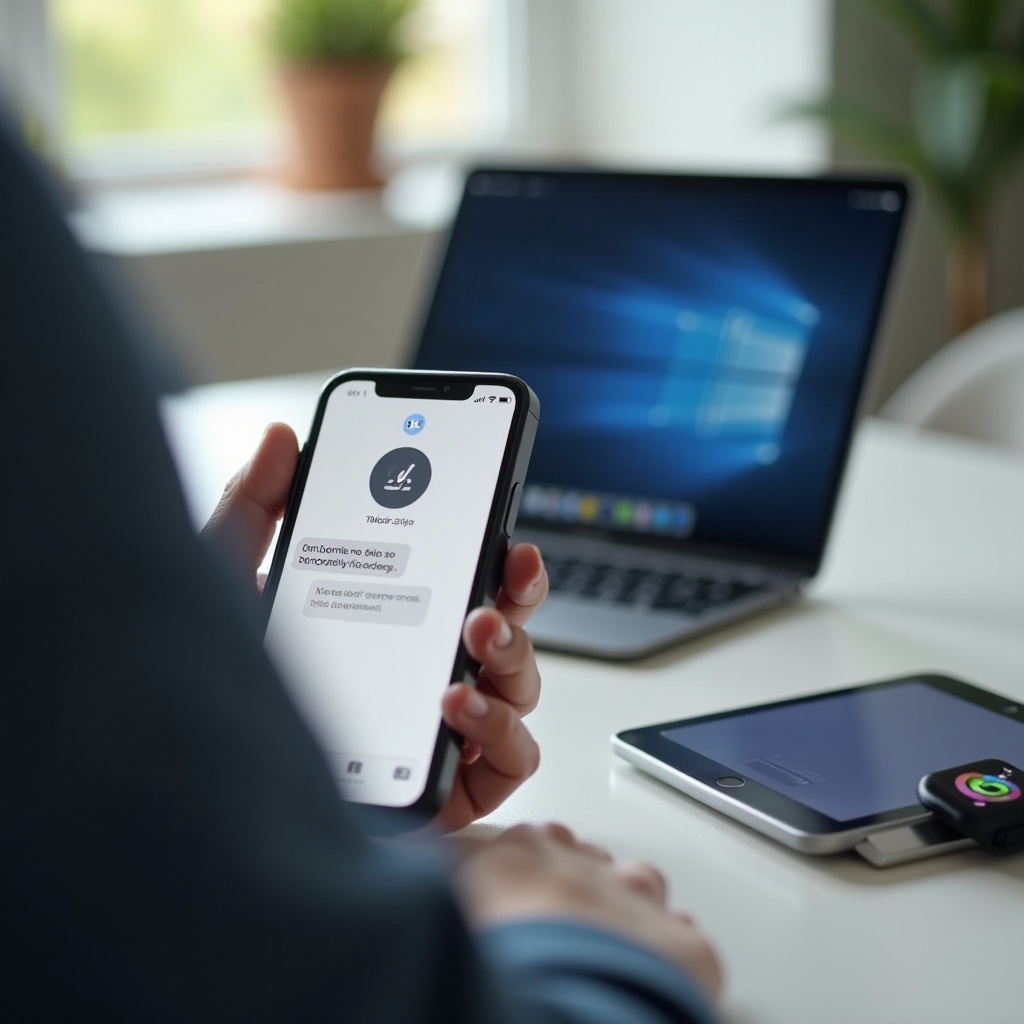
Preview, cancel, or re record before sending
– Tap Stop when you are done.
– Tap Play to review. If you hear wind, tapping, or muffled sound, delete and try again.
– Ready to send You can tap Send to deliver the clip over iMessage with end to end encryption.
Send to individuals or group chats
– The same Audio tool works in group threads.
– Add a quick label at the start, such as name or topic, so listeners know who the message is for.
– If some people are not on iMessage, your phone may try MMS. Delivery and quality may vary.
Change audio message expiration settings
– Audio messages might auto delete to save space on some setups. Open Settings > Messages and look for an Audio Messages or Expire option. If your version shows it, set to Never to keep messages by default.
– To preserve a specific clip, long press the audio bubble and tap Keep.
Pro tips for cleaner sound
– Face a soft surface such as a pillow or curtain to cut echo.
– Pause before you start, then speak clearly for the first two seconds so the mic adapts.
– Keep clips short. Most people respond faster to messages under a minute.
With iPhone under control, move to iPad for the same tools on a larger canvas, which helps when you review and organize multiple clips.
iPad: Send Voice Messages from the Messages App
Everything you can do on iPhone works on iPad with extra screen space for review, longer text notes, and smoother multitasking. The larger layout makes it easier to manage audio alongside other apps.
Accessing Audio from the app drawer
– Open Messages and select a conversation.
– Tap the plus button to open the app drawer, then tap Audio.
– Press and hold to record, or swipe up to lock for hands free recording. Tap Stop when finished.
– Tap Play to preview. Tap X to delete and re record, or tap Send to deliver.
Using external keyboards and microphones
– An external keyboard lets you mix typing and audio. Type a short intro, then add a voice clip for tone.
– For higher quality, connect a USB C microphone on supported iPads or pair AirPods. Test levels in Voice Memos or a third party audio app.
– Add Hearing to Control Center to watch input levels while you record.
You now have iOS and iPadOS covered. Next, use your Mac to record longer, clearer audio and save or export messages with desktop convenience.
Mac: Record and Send Audio Messages in Messages for macOS
Mac offers more control over microphones and file management. It is a great way to record longer directions, team updates, or family stories without juggling the phone.
Start, review, and send from your Mac
– Open Messages and choose a conversation.
– Click the plus button near the text field and select Audio.
– Click the record button to start and click Stop to finish.
– Click Play to review. Delete and re record if you need a clearer take. Press Return or click Send to deliver.
Improve quality with input settings and external mics
– Open System Settings > Sound > Input to select your mic and set input level. Aim for consistent volume in the middle of the meter.
– A USB mic or AirPods often improves clarity. Reduce room echo by recording closer to the mic and away from hard walls.
– Create a dedicated Finder folder for saved clips. When you export audio from Messages, move it into that folder so you can find it later.
When you cannot reach your phone or Mac, Apple Watch steps in for short updates. Use it for quick replies on the go.
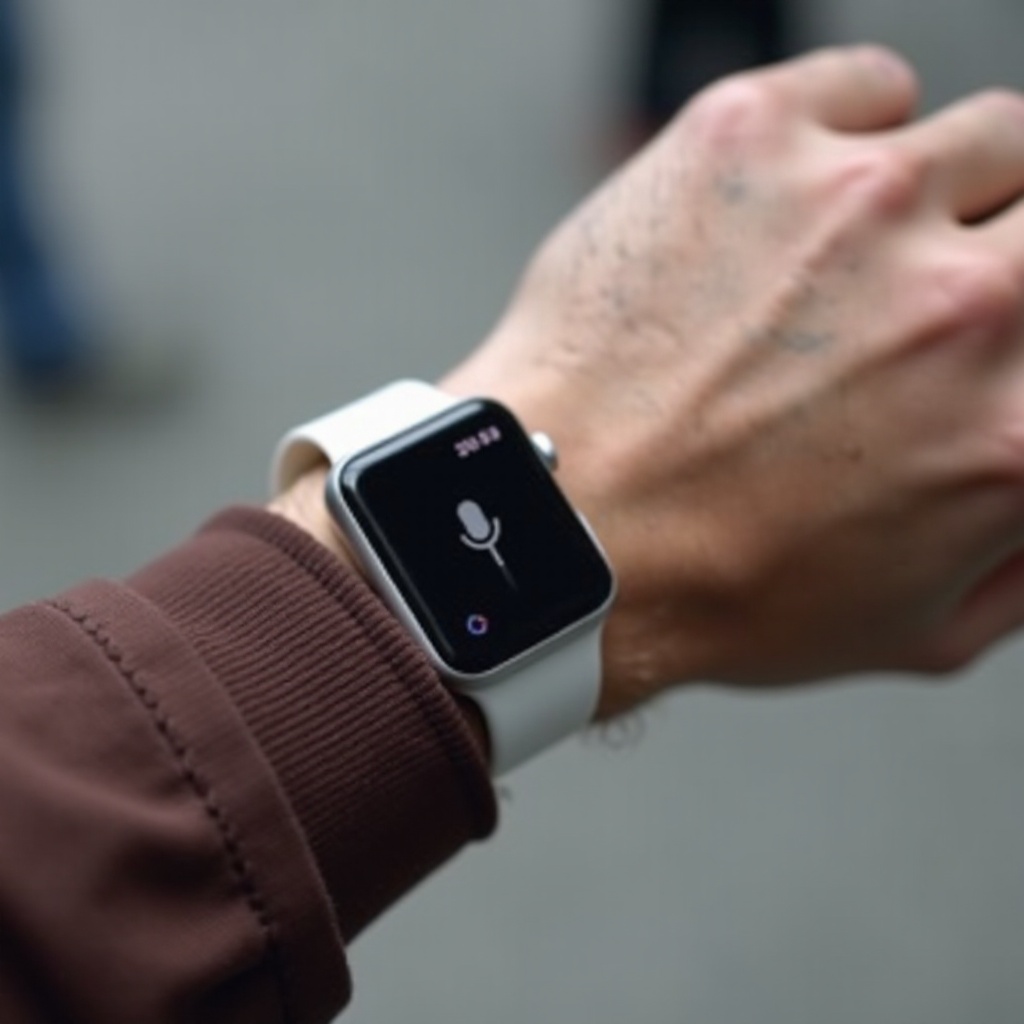
Apple Watch: Send Quick Audio Messages from Your Wrist
Apple Watch is perfect for fast voice replies when walking, commuting, or cooking. Keep messages short and clear, since wind and outdoor noise can interfere.
Choose audio vs dictation default
– On iPhone, open the Watch app and tap Messages. Pick how you prefer to reply: audio, dictation, or a preference that prioritizes audio when possible.
– If dictation appears by default on your watch, you can still pick the audio option on the reply screen.
Record and send a voice message in Messages
– Open Messages on Apple Watch and select a conversation.
– Tap the compose field and choose the audio icon if prompted.
– Record your message. Tap Send when done.
– Lift your wrist closer to your mouth and turn away from wind to improve clarity.
With recording handled on all devices, learn how to manage the clips you receive so your inbox stays tidy and the important parts remain accessible.
Listen, Keep, and Organize Voice Messages
Good organization makes voice messages more useful. You can scan, keep, and prioritize important audio while clearing the rest. This keeps storage under control and helps you find what matters later.
Playback controls and transcriptions
– Tap or click a received audio bubble to play or pause. Depending on your device and software, you can scrub or change playback speed.
– Transcriptions may appear under the clip. Skim the text when you cannot play sound in public. If the transcription looks off, play the clip to confirm.
Keep vs expire: prevent auto delete
– Some setups remove audio after a time to save space. Look for an Expire setting in Settings > Messages. If present, set it to Never to keep clips by default.
– You can also long press an audio bubble and tap Keep to preserve a specific clip.
– In group chats, ask participants to keep key clips so nothing important disappears.
Pin important conversations for faster access
– Pin frequent contacts at the top of Messages. On iPhone or iPad, swipe right on a thread and tap Pin, or long press and choose Pin. On Mac, right click and choose Pin.
– Use pinned threads for ongoing voice exchanges and follow up quickly without scrolling.
Next, save and export the audio that needs a home outside Messages, such as notes for a project, instructions, or memories you want to archive.
Save, Share, and Export Audio Messages
Messages keeps your audio in the chat, but you may want copies elsewhere for safekeeping or collaboration. Saving and sharing gives you control over backups and lets you use clips in other apps.
Save to Voice Memos or Files
– On iPhone or iPad, long press the audio bubble and look for options like Save, Add to Voice Memos, or Save to Files. Choose a folder in iCloud Drive so you can find it from all devices.
– On Mac, drag an audio clip from Messages to the desktop or a Finder folder. You can also use the context menu to save.
Share audio outside iMessage securely
– Use the Share sheet to send a clip via Mail, AirDrop, or another app. Remember that iMessage audio is end to end encrypted only inside Messages.
– Once exported, protect sensitive clips with secure cloud storage, strong passwords, and limited sharing. Remove files from shared folders when you no longer need them.
Even with good habits, things sometimes fail. If recording or sending does not work, these quick checks solve most problems.
Troubleshooting: Voice Messages Not Working in iMessage
Start with the most common causes and move step by step. Test after each change so you know what fixed the issue.
Audio button missing after an update
– Force quit Messages and reopen it.
– Restart your device.
– On iPhone or iPad, the microphone moved into the plus button app drawer. Open a chat, tap plus, and tap Audio.
– Update iOS, iPadOS, or macOS to the latest available version.
– Check Screen Time restrictions for Messages and microphone use.
Not Delivered errors and connectivity fixes
– Open Settings > Messages and confirm iMessage is on and activated.
– Toggle Airplane Mode on and off, or switch Wi Fi networks.
– If the contact uses Android or has iMessage turned off, send a link to a file instead of an MMS audio clip, or use Mail.
– Sign out of your Apple ID in Messages and sign back in if activation appears stuck.
No sound or microphone permissions blocked
– On iPhone or iPad: Settings > Privacy and Security > Microphone > allow Messages.
– On Mac: System Settings > Privacy and Security > Microphone > allow Messages.
– Remove thick cases that cover mic openings. Clean dust with care.
– Test recording in Voice Memos to confirm hardware works. If the recording is quiet, switch to a different mic such as AirPods.
Recipient not on iMessage
– Green bubbles mean SMS or MMS. Carriers may compress or block audio. Share a link from Files or send by email to preserve quality.
Storage and expiration issues
– Free up space in Settings > General > iPhone Storage, or use storage tools on Mac.
– Long press important audio and tap Keep so it does not disappear.
– If your version offers an Expire setting in Messages, set it to Never.
After you fix issues, remember to send a short test clip to confirm everything works. Finally, keep privacy and etiquette in mind so your voice messages land well in any situation.
Privacy, Security, and Etiquette for Voice Messages
Your voice is personal. iMessage encrypts audio between Apple devices, which keeps clips private inside Messages. The moment you export a file to Mail, cloud storage, or another app, that protection changes. Share only what you must and store sensitive audio in trusted, secure locations.
Use audio when tone matters or when typing slows you down. Use text when the recipient needs a quick, searchable note. Ask before sending long clips and keep most messages under a minute. Avoid names, addresses, or private details when you are in public or when others can overhear. Some places require consent to record; follow local rules. Double check recipients before you tap Send, especially in busy group threads.
Seen as a whole, these habits keep your voice messages clear, respectful, and secure.
Conclusion
You now know how to send voice message on imessage on iPhone, iPad, Mac, and Apple Watch. Tap the plus button, choose Audio, and record with confidence. Preview before sending, keep or save the clips you need, and export carefully when you want a copy outside Messages. If problems arise, check permissions, connectivity, and the new app drawer location. With a few simple habits and the right settings, you will share rich, fast updates that your contacts can hear and act on right away.
Frequently Asked Questions
Why can’t I find the microphone icon in Messages?
Apple moved the old mic into the Messages app drawer. Open a chat, tap the plus button, then tap Audio to record. If plus is missing, update your device, force quit Messages, and try again. On Mac, click the plus near the text field and pick Audio. Also check Screen Time restrictions and confirm iMessage is enabled with your Apple ID.
Do audio messages automatically delete in iMessage?
Some setups remove audio after a time to save space. To keep a clip, long press the audio bubble and tap Keep. Also open Settings > Messages and look for an Audio Messages or Expire option. If your version shows it, set it to Never. For long term storage, save important clips to Voice Memos or Files.
Can Android users receive my iMessage voice messages?
If the recipient does not use iMessage, your phone may try to send audio as MMS. Carriers can limit or compress audio, and some may not deliver it. If delivery fails or quality drops, share a link to a file in iCloud Drive, send by email, or use a cross platform messaging app. Cloud links often preserve quality best.